ngFor Fatto Bene
July 04, 2019
Quando stiamo sviluppando dei template che usano liste, ngFor ci salva un sacco di tempo, ma potrebbe aver effetti disastrosi se usato male. Leggi questo articolo per avere delle dritte su come usarlo al meglio 🤩

Foto di Kolleen Gladden su Unsplash
Tutte le informazioni contenute in questo articolo si possono trovare anche nella documentazione ufficiale
Prerequisiti
Durante questa guida, useremo un’interfaccia che rappresenta gli oggetti delle nostre liste, chiamiamola Item e dichiariamola:
export interface Item {
  _id: string
  name: string
}
poi aggiungiamo un po’ di funzioni di utilità che ci aiuteranno più avanti:
export const items: Item[] = [{ _id: "a2fHdS8P", name: "Mike" }]

export const makeRandomId = (): string => {
  let result = ""
  const characters =
    "ABCDEFGHIJKLMNOPQRSTUVWXYZabcdefghijklmnopqrstuvwxyz0123456789"
  const charactersLength: number = characters.length
  for (let i = 0; i < 8; i++) {
    result += characters.charAt(Math.floor(Math.random() * charactersLength))
  }
  return result
}

export const makeRandomName = (): string => {
  const names = [
    "Sara",
    "Mattia",
    ...
  ]

  return names[Math.floor(Math.random() * names.length)]
}

export const getItems = (length): Item[] => {
    const items = new Array(length);
    return items.map(item => {
        return {
            _id: makeRandomId(),
            name: makeRandomName()
        };
    });
}
Prima di tutto: trackBy
trackBy è una funzione che definisce come verificare i cambiamenti degli oggetti presenti nelle liste che andremo ad iterare. Questo significa che possiamo usarla per sapere esattamente quali oggetti in una lista sono cambiati, dopo una chiamata di rete o per altri motivi, ad esempio.
Implementiamo questa funzione nel nostro file .ts:
trackByFunction (index, item) {
  return item._id;
}
Poi nel nostro .html aggiungiamo la nuova funzione:
<div *ngFor="let item of items; trackBy: trackByFunction"></div>Facendo questo la nostra app sarà molto più performante perché non dovrà ricaricare tutta la lista ogni volta, ma ricaricherà solo gli elementi cambiati
even e odd vengono dopo
Le variabili even e odd sono usate principalmente per aggiungere lo stile ai componenti.
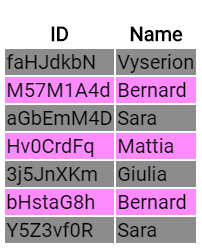
Per esempio, quando abbiamo una tabella e vogliamo renderla più leggibile possiamo usare queste variabili per cambiare i colori di sfondo delle righe.
Nel vostro html:
<table>
  <thead>
    <tr>
      <th>ID</th>
      <th>Name</th>
    </tr>
  </thead>
  <tbody>
    <tr
      *ngFor="let item of items; trackBy: trackBy; odd as odd; even as even"
      [ngClass]="{ 'odd': odd, 'even': even }"
    >
      <td>{{ item._id }}</td>
      <td>{{ item.name }}</td>
    </tr>
  </tbody>
</table>
E nel vostro file css/scss:
.odd {
  background-color: rgba(255, 0, 255, 0.45);
}

.even {
  background-color: rgba(0, 0, 0, 0.45);
}
Il risultato sarà qualcosa del genere
Parlami di first e last
Esattamente come even e odd, le variabili first e last sono anch’esse usate per aggiungere stile ai componenti.
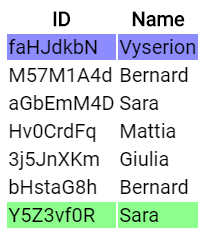
Usiamo la tabella di prima e settiamo le classi solo per le righe first e last:
<table>
  <thead>
    <tr>
      <th>ID</th>
      <th>Name</th>
    </tr>
  </thead>
  <tbody>
    <tr
      *ngFor="let item of items; trackBy: trackBy; first as first; last as last"
      [ngClass]="{ 'first': first, 'last': last }"
    >
      <td>{{ item._id }}</td>
      <td>{{ item.name }}</td>
    </tr>
  </tbody>
</table>
.first {
background-color: rgba(0, 0, 255, 0.45);
}
.last {
background-color: rgba(0, 255, 0, 0.45);
}Ecco cosa ne uscirà
Non dimentichiamo di index
La variabile index fa proprio quello che pensi faccia, indica l’indice dell’elemento in una lista.
Forse è la variabile che più viene usata quando usiamo le liste, pensa solo se vorresti posizionare gli elementi in base al loro indice usando il css.
<mat-list>
  <mat-list-item *ngFor="let item of items; trackBy: trackByFunction; index as index">{{ item.name }} index is {{ index }}</mat-list-item>
</mat-list>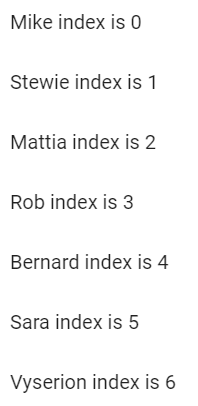
Questo è tutto 😍
In questa piccola e semplice guida abbiamo visto com’è possibile ottenere il meglio da ngFor con il minimo sforzo.
Tutto il codice utilizzato nella guida è disponibile su Stackblitz e su GitHub, vai pure a giocarci ✌
Do you want to be updated when new articles are being published?
Join the newsletter! 😎


